
How to boot a new Rails project with Docker and Heroku
A few years ago, I used Heroku to deploy my side-project. It provides great service, but I remember that updates to the Heroku Stack was a nightmare … Versions of the OS (and nearly everything) changed. The migration was a matter of days, and while doing a side-project, this was difficult. At the time, I remember thinking that using branches and VMs would have been the solution.
Now that I started to use Heroku again, I decided to use Docker from the beginning. More specifically, I am expecting :
- to have a minimal setup on my host machine
- to use the same infrastructure in dev than in production
- to simplify switching to a new machine
- to simplify the migration to the next Heroku stack
As an added benefit, if ever someone else joins me in my side-project, it will be a matter of minutes before we can all work on the same infrastructure !
Heroku provides a tutorial about how to deploy an existing Rails app to heroku using containers. Unfortunately, I did yet have an existing rails app … So the first challenge I faced, was how to create a Rails app without actually installing Rails on my machine. The trick is to bootstrap rails in docker itself before packaging all this for Heroku.
1. Install the required software
I installed only 4 things on my host machine
- Docker instructions
- Docker Compose instructions
- Heroku Toolbelt instructions
- Heroku container plugin
heroku plugins:install heroku-container-tools
That’s all I changed to my host machine.
2. Setup docker
First, let’s create a new dir and step into it. Run :
mkdir docker-rails-heroku
cd docker-rails-heroku
To prepare the Heroku setup, create a Procfile
web: bundle exec puma -C config/puma.rb
and app.json
{
  "name": "Docker Rails Heroku",
  "description": "An example app.json for container-deploy",
  "image": "heroku/ruby",
  "addons": [
    "heroku-postgresql"
  ]
}
To generate docker files for Heroku, run :
heroku container:init
You want to run Rails in dev mode locally, so we need to override Heroku’s default env (Check my previous post for details)
Create an .env file
RAILS_ENV=development
and docker-compose.override.yml
web:
  volumes:
    - '.:/app/user'
  environment:
    RAILS_ENV: "${RAILS_ENV}"

shell:
  environment:
    RAILS_ENV: "${RAILS_ENV}"
3. Create the Rails app
It’s now time to follow the official docker-compose rails tutorial to bootstrap the rails app and directories :
Change Dockerfile to
# FROM heroku/ruby

FROM ruby:2.2.0
RUN apt-get update -qq && apt-get install -y build-essential libpq-dev nodejs
RUN mkdir /myapp
WORKDIR /myapp
ADD Gemfile /myapp/Gemfile
ADD Gemfile.lock /myapp/Gemfile.lock
RUN bundle install
ADD . /myapp
Create a bootstrap Gemfile with the content
source 'https://rubygems.org'
gem 'rails', '4.2.0'
Bundle install within the container requires a existing Gemfile.lock
# Create an empty Gemfile.lock
touch Gemfile.lock
It’s now time to build your docker container to be able to run rails and generate your source files. Run the following :
# Build your containers
docker-compose build

# Run rails within the shell container and generate rails files
docker-compose run shell bundle exec rails new . --force --database=postgresql --skip-bundle
Unfortunately, rails is ran as root inside the container. We can change ownership and rights with this command :
# Change ownership
sudo chown -R $USER:$USER .

# Change rights
sudo chmod -R ug+rw .
4. Make it Heroku ready
Now that the rails files are generated, It’s time to replace the bootstrap settings with real Heroku Dockerfile
Revert Dockerfile to simply :
FROM heroku/ruby
Heroku uses Puma so we need to add it to our Gemfile
# Use Puma as the app server
gem 'puma', '~> 3.0'
We also need to add a config file for Puma. Create config/puma.rb with this content (you can check heroku doc for details)
workers Integer(ENV['WEB_CONCURRENCY'] || 2)
threads_count = Integer(ENV['RAILS_MAX_THREADS'] || 5)
threads threads_count, threads_count

preload_app!

rackup      DefaultRackup
port        ENV['PORT']     || 3000
environment ENV['RACK_ENV'] || 'development'

on_worker_boot do
  # Worker specific setup for Rails 4.1+
  # See: https://devcenter.heroku.com/articles/deploying-rails-applications-with-the-puma-web-server#on-worker-boot
  ActiveRecord::Base.establish_connection
end
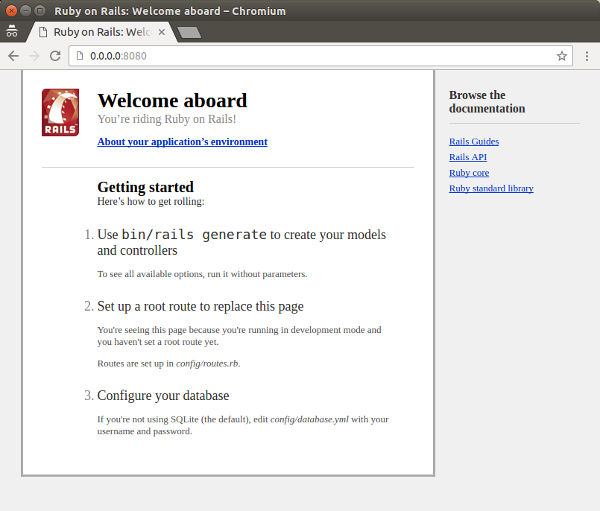
It should now be possible to rebuild the container, and run the app :
# Rebuild the containers
docker-compose build

# Start the rails app using the web container
docker-compose up web
The app should be accessible at http://0.0.0.0:8080
5. Deploying to heroku
We’re almost ready to deploy to heroku.
First, we need to exclude development files from our image. For this, we need to create a .dockerignore file with the content
.git*
db/*.sqlite3
db/*.sqlite3-journal
log/*
tmp/*
Dockerfile
.env
docker-compose.yml
docker-compose.override.yml
README.rdoc
It’s then classic Heroku deploy commands :
# create an Heroku app
heroku apps:create <your-app-name>

# And deploy to it
heroku container:release --app <your-app-name>
Your app should be accessible on line at https://
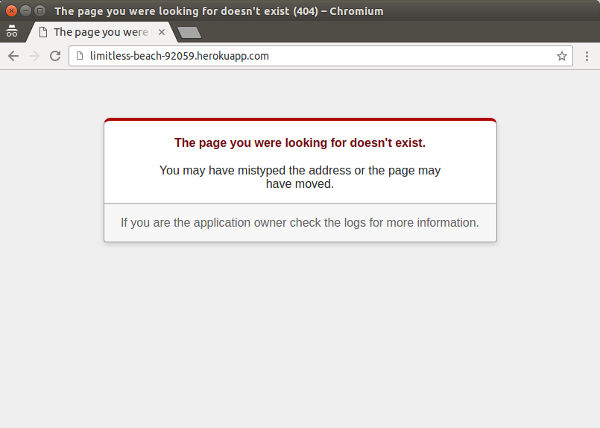
Rails does not provide a default homepage in production. But you can check the logs with
heroku logs --app <your-app-name>
6. Running commands
When in development mode, you might want to run rails or other commands on your source code again. The shell container exists just for that, run docker-compose run shell ....
# For example, to update your bundle
docker-compose run shell bundle update
EDIT 2016-07-20
For the moment, there’s a catch with bundle install or update commands, as the gems are installed outside the shared volume, only Gemfile.lock will be updated, which required to run docker-compose build again … I’ll have a look into this later and see if I can fix that.
docker-compose run shell bundle update
docker-compose build


Leave a comment